For my mushroom chess piece set, I first needed to plan out my desired dimensions for each piece. I referred to the chess piece manual and decided to go by the 'standard' chess piece set dimensions. The smallest piece (pawn) will have a diameter of 20 mm and I will make them larger as the pieces move up in hierarchy.
This was my first initial attempts at making the button mushroom. I used interpolate curves to create a 2D curve which I then revolved into the mushroom cap. Using 'points on' I was able to remodel the surface of the cap and give it that nice indent that button mushrooms embody.


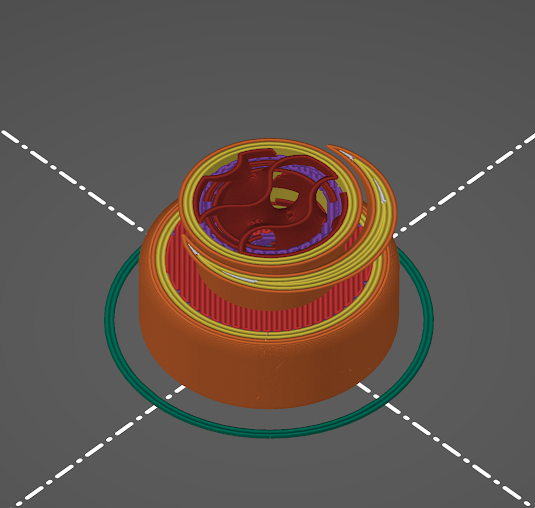
I ran into some issues here. I wanted to test this out and so I placed it into Prusa Slicer. This was what appeared:


I will use pegs for all of my pieces as the caps will need to be treated in the same fashion. I still thought that my pieces were kind of boring... so I made one last set of revisions (lol). I added a face, arms and feet to the little dudes!

These look wayyyy cuter and I will add the same features to the rest of the chess family. But I still didn't like their overall placement and I think it would be easier to just make the body of the mushroom with a peg on top. I could then use 'boolean difference' to create the hole in the cap. Easier!
A pawn and bishop
As you can see from the image above, I changed how the pieces stack on each other. This will make for easier printing!
The next piece I had to create was a morel mushroom. At first I thought I'd make a grid of curves, pipe them, boolean union them and then mold them using the rebuild command. I asked Bryan for some guidance and he recommended that I put the overall shape of the mushroom into meshmixer. From there I can create a pattern on the shell of the mushroom, creating a 'voronoi' texture that looks like this:

The next piece I had to create was a morel mushroom. At first I thought I'd make a grid of curves, pipe them, boolean union them and then mold them using the rebuild command. I asked Bryan for some guidance and he recommended that I put the overall shape of the mushroom into meshmixer. From there I can create a pattern on the shell of the mushroom, creating a 'voronoi' texture that looks like this:
After creating the shapes as per his instructions, I ended up with something like this:

Voronoi pattern in Meshmixer
After combining them using boolean union, I exported the file back into rhino and ended up with a mesh. I then created the base of the mushroom and voila:


This is probably my favourite piece of the set. I then went ahead and made the remaining pieces, which didn't take me too long now that I have my workflow figured out:

I am really happy with how all of the pieces turned out. Now to begin 3D printing!
I first started printing my pieces at 0.20mm normal; however, it made my pieces look a little too stringy. I decided to print the remainder of my pieces at 0.15mm instead, since each piece (base and cap) takes roughly 30-45 min.
I also had a little mishap with one of my prints. I began printing my rook and waited until 2-3 layers had printed before leaving it alone. When I came back, the printed piece had come off of the printing bed, leaving a stringy mess in its wake:

I learned that it's important to ensure the printing bed is at a sufficient temperature to prevent this from happening. Also, it's wise to incorporate a brim when printing smaller, or rounder objects, to ensure the plastic sticks! It also helps to wipe down the bed with alcohol to ensure there isn't any greasy residue left behind from someone else's hands.
I feel fairly confident using the printers now and think they're so much fun!!
Anyways, here is the result of my finished pieces:
I feel fairly confident using the printers now and think they're so much fun!!
Anyways, here is the result of my finished pieces:
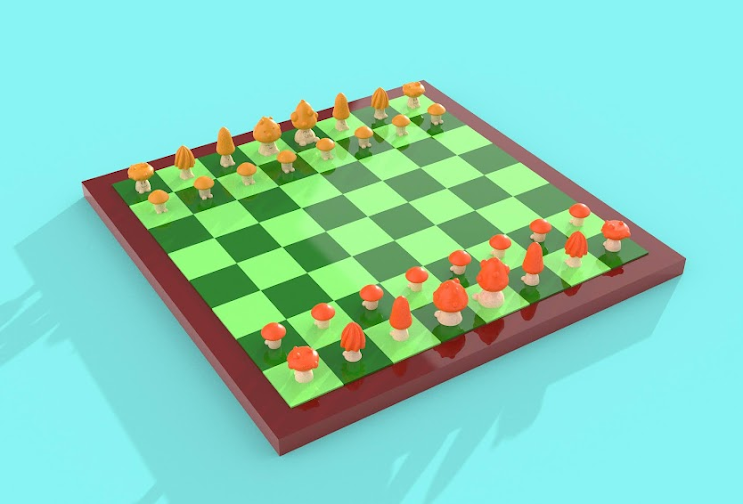
And here is what the pieces look like on an imaginary chess board! (I think I made them pretty cute)


Comments
Post a Comment